Wednesday, October 28, 2009

Microchip PIC 16F84 Microcontroller

Microchip manufacture a series of microcontrollers called PIC. You can see the range of their microcontrollers here. There are many different flavours available, some basic low memory types, going right up through to ones that have Analogue - To- Digital converters and even PWM built in. I am going to concentrate on the 16F84 PIC. Once you have learnt how to program one type of PIC, learning the rest is easy.

There are several ways of programming the PIC - using BASIC, C, or Assembly Language. I am going to show you the Assembly Language. Don't be put off by this. There are only 35 instructions to learn, and it is the cheapest way to program the PICs, as you do not need any extra software other than the freebies.

The 16F84 Pins

Below is a diagram showing the pin-outs of the PIC 16F84. I will go through each pin, explaining what each is used for.

Sunday, October 25, 2009

Classic Game Room

The Ninendo Entertainment System

Old School Gamer also repaired my NES which has not been working well since we used it to record the Classic Game Room episodes back in 2000. Yes Game Room fans, this is the actual NES and Sega Genesis used to capture footage for the illustrious Classic Game Room. You know the Genesis we hold up during the X-Men episode? I bought this in 8th grade with Altered Beast and it still works flawlessly today.

M.U.S.H.A. the best Shmup for the Genesis

The s-video brings out sharper details in the graphics and text (it's really noticeable in the text on M.U.S.H.A. and Herzog Zwei, my two favorites). The shadows beneath the jet in Herzog are now clearly a group of dots instead of a blur. The colors are much better of course. It was like playing MUSHA again for the first time because of all the detail in there.

My NES looks really nice too, but to be fair I never used it on my current setup. Which although isn't fancy, is better than the 19" TV I had 7 years ago.

Xbox 360 HDMI cable

I use the HDMI with my Xbox 360 which outputs games in 720p. I got the Atari Classics game for Xbox and love playing Yars' Revenge in HD. The Quotile are that much sharper and scarier. I still suck at Pong, even in HD.

It's probably pretty excessive to mod a 20 year old game system, but as I tell people, "I don't golf. I watch movies and play video games. I have all those dozens of dollars left over to spend on classic game cartridges."

PS2 and Genesis controllers

Holy video game controllers, Batman!

What's your favorite controller? Personally I like the PS2 and Genesis controllers the best, but the Xbox 360 controller is growing on me. I never did care for the original Atari 2600 controller, which is why I got the European version that feels more like the old-school NES gamepad.

Sega

Herzog Zwei for the Sega Genesis

As work on the new Westinghouse documentary has been moving along, we're nearing the narration of the film and final editing. I've been pretty darned busy. Coupled with a few editing system complications is the fact I had to re-write part of the script about the Burlington Brake Trials in 1886 after learning a few more facts from some train experts who are kind enough to help out.

Anyway, by the time I get home, walk the dog, cook dinner with my wife and actually sit down its already 10pm and I'm usually too damn tired to do anything except hide in my basement for an hour or two and succumb to my addiction to Xbox Live

Proportional, Integral AND Derivative (PID) controller

A Proportional, Integral AND Derivative (PID) controller is an interesting method and mechanism to control the output by viewing input and is mostly used in industrial control applications but now a days its application are very common and we see it working in every controller. A PID controller can be used for regulation of speed of automobile or AC motors , DC motors or servo motors and stepper motors, temperature of furnace or oven or water baths used in laboratories and hospitals, flow of fluids in industry, pressure and other process variables very common in industry. It is viewed that the Field mounted PID controllers are normally placed close to the sensors or the control regulation devices and be monitored centrally using a SCADA system.For example The Temperature Control using a Digital PID controller on boiler in any industry where boiler are used.

A typical PID temperature controller application could be to continuously vary a regulator which can alter a process temperature (for example, but it could be any process parameter or variable). If we take a basic temperature controller in our mind which works on PID mechanism, then we can say that This may be a pulsed switching device for electrical heaters or by opening and closing a gas valve, it depends upon what is the heating source in that particular application. Generally speaking, A heat only PID temperature controller uses a reverse output action, i.e. more power is applied when the temperature is below the set-point and less power when above. PID control for injection and extrusion applications often employ additional cooling control outputs and usually require multiple controllers.

A PID controller is sometimes called a three term controller also. It reads the sensor signal, normally from a thermocouple or RTD, and converts the measurement to engineering units e.g. Degrees C. It then subtracts the measurement from a desired set point to determine an error. The complete PID controller involves very basic section built in which starts from sensor, sensor interface circuitry, ADCs, micro-controllers, output interfacing circuitry, heater or boiler and the display.

The error is acted upon by the three terms, which are Proportional, Integral AND Derivative (P, I & D) simultaneously, The working principles of each of the term is explained below:
PID Controller Theory
The following section examines PID controller theory and provides further explanation of the question `how do PID controllers work'. The function of PID depends upon three gains (effecting factor ) of three parts known as Proportional gain, Integral gain and Derivative gain.
Proportional (Gain)
The error is multiplied by a negative (for reverse action) proportional constant P, and added to the current output. "P" represents the band over which a controller's output is proportional to the error of the system. E.g. for a heater, a controller with a proportional band of 10 deg C and a setpoint of 100 deg C would have an output of 100% up to 90 deg C, 50% at 95 Deg C and 10% at 99 deg C. If the temperature over-shoots the set-point value, the heating power would be cut back further. Proportional only control can provide a stable process temperature but there will always be an error between the required setpoint and the actual process temperature.
Integral Gain or Reset Gain
The error is integrated (averaged) over a period of time, and then multiplied by a constant I, and added to the current control output. I represents the steady state error of the system and will remove setpoint / measured value errors. For many applications Proportional + Integral control will be satisfactory with good stability and at the desired setpoint.
Derivative Gain (Rate of change gain)
The rate of change of the error is calculated with respect to time, multiplied by another constant D, and added to the output. The derivative term is used to determine a controller's response to a change or disturbance of the process temperature (e.g. opening an oven door). The larger the derivative term, the more rapidly the controller will respond to changes in the process value.

Tuning of PID Controller Terms

The P, I and D terms need to be "tuned" to suit the dynamics of the process being controlled. Any of the terms described above can cause the process to be unstable, or very slow to control, if not correctly set. These days temperature control using digital PID controllers have automatic auto-tune functions. During the auto-tune period the PID controller controls the power to the process and measures the rate of change, overshoot and response time of the plant. This is often based on the Zeigler-Nichols method of calculating controller term values. Once the auto-tune period is completed the P, I & D values are stored and used by the PID controller.

Types of Feedback Controls

There are many controlling methods and mechanism used in daily life to control the processing parameters in labs and industry. Here we will discuss a few of them and our main concern will be on temperature controllers specifically. Thus keeping in mind about a temperature controller of an oven, which are the common methods used, we start with the most simple on method which is The ON-OFF control.

The On-Off Control

This is the simplest form of control, used by almost all domestic thermostats. When the oven is cooler than the set-point temperature the heater is turned on at maximum power, suppose it is M, and once the oven is hotter than the set-point temperature the heater is switched off completely. The turn-on and turn-off temperatures are deliberately made to differ by a small amount, known as the hysteresis H, to prevent noise from switching the heater rapidly and unnecessarily when the temperature is near the set-point.

Proportional Control

A proportional controller attempts to perform better than the On-Off type by applying power, W, to the heater in proportion to the difference in temperature between the oven and the set-point. where P is known as the proportional gain of the controller. As its gain is increased the system responds faster to changes in set-point but becomes progressively under damped and eventually unstable. The final oven temperature lies below the set-point for this system because some difference is required to keep the heater supplying power. The heater power must always lie between zero and the maximum M because it can only source, not sink, heat.

Proportional+Derivative Control

The stability and overshoot problems that arise when a proportional controller is used at high gain can be mitigated by adding a term proportional to the time-derivative of the error signal,
This technique is known as PD control. The value of the damping constant, D, can be adjusted to achieve a critically damped response to changes in the set-point temperature.

Proportional, Integral and Derivative Control

Although PD control deals neatly with the overshoot and ringing problems associated with proportional control it does not cure the problem with the steady-state error. Fortunately it is possible to eliminate this while using relatively low gain by adding an integral term to the control function which becomes
where I, the integral gain parameter is sometimes known as the controller reset level. This form of function is known as proportional-integral-differential, or PID, control. The effect of the integral term is to change the heater power until the time-averaged value of the temperature error is zero. The method works quite well but complicates the mathematical analysis slightly because the system is now third-order.

Proportional and Integral Control
Sometimes, particularly when the sensor measuring the oven temperature is susceptible to noise or other electrical interference, derivative action can cause the heater power to fluctuate wildly. In these circumstances it is often sensible use a PI controller or set the derivative action of a PID controller to zero.
Third-Order Systems
Systems controlled using an integral action controller are almost always at least third-order. Unlike second-order systems, third-order systems are fairly uncommon in physics but the methods of control theory make the analysis quite straightforward. For instance, applying the so-called Routh-Hurwitz stability criterion, which is a systematic way of classifying the complex roots of the auxiliary equation for the model, it can be shown that provided the integral gain is kept sufficiently small then parameter values can be found to give an acceptably damped response with the error temperature eventually tending to zero if the set-point is changed by a step or linear ramp in time. Whereas derivative control improved the system damping, integral control eliminates steady-state error at the expense of stability margin.

PCM2706 High Fidelity USB Soundcard or USB Headphones


This is a high fidelity external USB Soundcard / USB Headphones project that can be built for your PC or Mac. It is based on the latest PCM2706 IC which functions as a high quality, crystal clear 16-BIT Stereo DAC. It is a single chip digital-to-analog converter that offers two D/A output stereo channels, digital S/PDIF output and requires very few external components. PCM2706 includes integrated USB 1.0 & USB 2.0 compliant interface controller and it is conveniently powered directly from USB connection. PCM2706 is a USB plug-and-play device and does not require any driver installation under Windows XP and Mac OSX.

It is late player MP3 with single chip of RHOM

It is late player MP3 with single chip of RHOM. It comprises controller 1.1/2.0, MP3 the decoder of USB, amplifier of ear-phone and the controller of system for the form of files of loading MP3 an ordering of instantaneous of USB, orders hard USB or orders CD-ROM of USB/DVD-ROM that all in an ordering of instantaneous of USB of chip
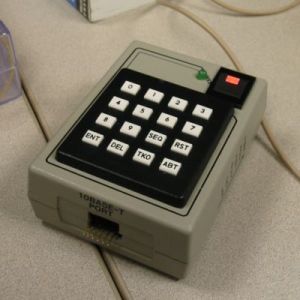
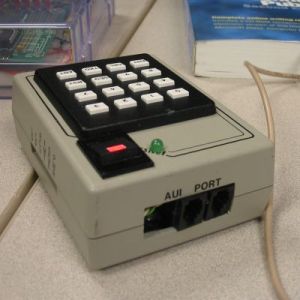
AOnce is connected, BU9432 seeks automatically files MP3 for the playback. Accoustics is ordered by the tactile buttons; Play, pause, stop, nearest, preceding, Fol+, Fol-, +10, -10, Volume+, volume, repetition, random. Can BU9432 the information of posting also on option on the liquid crystal display such as the shirt #, file #. The playback Time (minute, second), the name and the file name.
U9432 of shirt can decode VBR MP3, MP2, MP1, layer 1, 2, 3 files with the rate of taking away: 8K - 48KHz and binary rate: 8Kbps - 448Kbps. It can also identify the ordering of instantaneous of hard USB FAT16 and FAT32/commande of the capacity of 32MB with 2TBytes. The audio playback is exceptionally good with the report/ratio of the signal-to-noise 93dB and the dynamic range 88dB. With this type of piece you can make your clean iPOD;) for more info go here http://electronics-diy.com/store.php?sel=kits

Control stepper motor through your computer's parallel port.

Buildan easy stepper motor driver that will allow you to precisely control aunipolar stepper motor through your computer's parallel port.

The project comes with a program that has easy to use graphicalinterface, allows you to control the motor speed, direction inreal-time and it also allows you to use and learn about differentstepping methods, such as single stepping, high torque stepping andhalf stepping modes.

Stepper motor controller also displays an animation that helps youvisualize the current as it flows through individual coils. It is awonderful tool to learn how stepper motors work.

LED Operates Directly From AC


Acriche is the world’s first semiconductor light source that operates directly from AC power without a converter. This makes it suitable for many residential and commercial lighting applications where the main source of available power is AC.

  • Operates on AC power without additional conversion circuitry
  • Operating Voltage: 100V, 110V, 220V, 230V
  • Long Life: over 35,000 hours
  • No converter loss = higher fixture efficacy
  • Operating frequency: 50/60 Hz
  • Available in warm white and pure white
  • Multiple package options
  • I-Style PIC Microcontroller Learning Kit


    Auto Fish Feeder

    PIC 16F627A microcontroller was used.
    There are ROM 1kB , RAM 256 bytes.
    Can choose frequency per day (1-6 times a day).
    Can choose feeding level (1-10 level).
    The food in syringe is enought for about 1-1.5 month.


    USB PIC Programmer

    The Serial PIC programmer shipped with i-Style book doesn't work with USB to Serial converter, although it passed initialization process.
    So I decided to buy a new USB programmer, very expensive programmer, ET-PGM PIC USB V1, 1500 BHT.

    Its speed is sooooo impressive, about 1-300 times faster than the old one!!!
    It also has ICD2 (RJ-11 - telephone jack) port, so it can be used as software oscilloscope too.
    This example circuit receives 38kHz infrared signal from TV remote control.

    I think it's a little cheap now. ;-)


    PIC VU Meter

    I spent 2 days with this.
    VU Meter using PIC Microcontroller.

    No audio cable needed. Just plug in the power cord.
    It can be placed anywhere. Very high sensitive microphone can receive even whisper.
    (IC LM386 which are used in spy microphone circuit.)
    PIC 16F628A microcontroller is used to do DSP (Digital Signal Processing) and AGC (Auto volume gain controller).
    Currently it has 12 modes of running light.
    If there is no sound for a while, it will switch to running light mode.
    Then switch back to VU meter when sound was detected again.


    Low Voltage Setting for PIC microcontroller

    My Slave Flash didn't fire with camera's flash, don't know why.
    So I developed a new flash controller using PIC microcontroller.

    But the problem is,
    PIC 16F628A will work on at least 4.3 volt of power supply.
    2 cells of rechargable battery can only provide up to 2.4 volt.
    After asking on Pantip's webboard, I got the answer from Professor.
    I should tried setting Brown out reset=Disable, and it works!!!
    It works even at 1.7 volt. :D

    To set Brown out reset=Disable in Mikroelektronika mikroC,
    Click on Project -> Edit Project, then place checkmark on BOREN_OFF.
    If you don't use crystal higher than 4 MHz, you can remove checkmark on HS_OSC,
    and place checkmark on XT_OSC to reduce power comsumption.

    Modify Car MP3 Player (part 2)

    Oops! I did it again... errr... I mean I bought it again.

    A Car MP3 Player, 220 baht, with a new circuit design. (But the same crap sound quality)
    So I added an antenna and 2 capacitors to add more treble.
    Now its sound quality is better than some radio stations. ;-)

    - Antenna, use thin wire about 36 cm. long.
    Then soldered at ANT label.
    (I forgot to take the photo)

    - Use 2 small 0.0068uF capacitors, then soldered into the space as shown in photos.
    (I found only the big one from my spare)

    - Use cutter to cut the plastic filter between LCD display and infrared receiver.
    (Don't know what's that filter for)


    Microcontroladores 16F872

    Movie: Dear John (2010)

    Dear John is a romantic drama/war movie written by Jamie Linden and directed by Lasse Hallstrom, based on the book by Nicholas Sparks. Stars: Amanda Seyfried as Savannah Lynn Curtis, Channing Tatum as John Tyree, Scott Porter as Randy, Henry Thomas as Tim and Richard Jenkins as Mr Tyree (John's Father). The film will release on February 6, 2010 by Screen Gems. John Tyree grew up in Wilmington, North Carolina raised by a single dad whose wife dumped the two males in her life. However, John learns from his father's Asperger's syndrome and his mother's abandonment that relationships must remain short, one night stands being his modus operendi except for joining the army where he makes a lifetime commitment as an infantryman.

    Dear John HD Movie Trailer:


    When John was twenty-three and on leave he meets University of North Carolina special education major Savannah Lynn Curtis at Wrightsville Beach. They are attracted to one another though he is a social pariah and she volunteers her time for all types of social causes. They have nothing in common, but fall in love. John plans to leave the service once his enlistment is up so he can marry his beloved and raise a family with her; Savannah Lynn vows to wait for her Dear John. However, 9/11 changes the dynamics as he chooses country over love by reenlisting; she must decide between waiting and sending a "Dear John" letter by choosing a wannabe suitor, her long time friend Tim.

    dear john, movie, poster, film

    Movie: The Fourth Kind (2009)

    The Fourth Kind is a science fiction/thriller/horror movie written and directed by Olatunde Osunsanmi, stars: Milla Jovovich as Abbey, Elias Koteas, Will Patton, Corey Johnson as Tommy, Hakeem Kae as Kazim and Enzo Cilenti as Scott Stracinsky. The film will release on November 06, 2009 by Universal Pictures. 1n 1972, a scale of measurement was established for alien encounters. When a UFO is sighted, it is called an encounter of the first kind. When evidence is collected, it is known as an encounter of the second kind. When contact is made with extraterrestrials, it is the third kind. The next level, abduction, is the fourth kind. This encounter has been the most difficult to document…until now.

    The Fourth Kind HD Movie Trailer


    Structured unlike any film before it, The Fourth Kind is a provocative thriller set in modern-day Nome, Alaska, where mysteriously since the 1960s a disproportionate number of the population has been reported missing every year. Despite multiple FBI investigations of the region, the truth has never been discovered. Here in this remote region, psychologist Dr. Abigail Tyler (Milla Jovovich) began videotaping sessions with traumatized patients and unwittingly discovered some of the most disturbing evidence of alien abduction ever documented. Using never-before-seen archival footage that is integrated into the film, The Fourth Kind exposes the terrified revelations of multiple witnesses. Their accounts of being visited by alien figures all share disturbingly identical details, the validity of which is investigated throughout the film.

    the fourth kind, movie, poster, film

    Movie Review: Paranormal Activity

    I saw Paranormal Activity last Friday night, the media has done a nice spin job on promoting this movie and it convinced me to give it a gander. In the movie, we have a couple Katie Featherston and Micah Sloat who live alone in a two story home, Katie has been being haunted on and off since she was a little girl by what she believes to be a ghost. Moving into a new house with her boyfriend Micah, these "hauntings" start up again. Her boyfriend, not having known about this when they moved in together, becomes excited at first about the whole thing and wants to investigate it more. He goes out and buys a video camera and sets it up stationary on a tripod in their bedroom while they sleep in hopes of catching something, if anything on tape.

    The movie makes one wonder, what are those sounds you so often here at night? What would you see if you took video and audio recording while you slept? Or would you rather not know? Personally, I wasn't afraid after seeing this movie but I did come to the conclusion that I would not set up such equipment in my own home.

    Overall, I have much respect of the director. He's pulled off an amazing achievement by making an enjoyable film on a rock bottom budget. The movie is well done and uses almost all of the usual tools in the horror genre effectively with one notable exception; gore. Some of the shots are not too great and the entire movie is filmed at the home. If you like Ghost Hunters or any of the similar shows on TV, you'll probably like this movie very much. If you prefer the movie where the monster shows itself, rips off a few heads, and then is killed, you'll be disappointed and bored.

    Game: Nostalgia

    Nostalgia is a role-playing video game developed by Red Entertainment and Matrix Software, and published by Ignition Entertainment for the Nintendo DS. It will release on October 27, 2009. The game is set in the 19th century. Players take control of main character Eddy, son of a legendary English adventurer, and the adventure begins as Eddy and a cast of fellow Londoners set off on an adventure that takes them through London and the rest of the world. A central theme in Nostalgia is flight. Eddy makes use of a dirigible in his travels. When playing, you move about the world through the air rather than walking around on an overworld map. Your air ship also comes into play during battles, as in addition to fighting standard party-based command battles when exploring dungeons, you also engage in air based battles against other air ships.

    Nostalgia Exclusive Launch Trailer


    nostalgia, video, game, coverGame features:

    Ambitious, fully 3D polygonal graphical engine offers dramatic, sweeping camera angles and impressive vistas rarely seen in a DS title.

    Cohesive, anime-inspired art direction that effectively captures the game’s turn-of-the-century charm.

    Travel to incredibly unique, non-traditional RPG locales via airship including London, New York, Cairo, Africa, and Russia.

    Features two distinct combat engines: One is a brisk, turn-based close-quarters melee between your party members and monsters; while the other offers thrilling, large-scale airship battles. In addition, your battle skills are scored at the conclusion of each conflict, inspiring strategic mastery.

    Handy in-game notebook feature keeps track of people, monsters, airships and items you’ve run across.

    Plenty of user-defined customization, allowing the player to trick out his or her airship with various weapons, armor types, and special skill attacks. The player can also choose character-specific skills from a branching tree for a more personalized experience.

    Explore a variety of diverse, engaging dungeons that include brain bending puzzles and tricky Indiana Jones-style traps.

    Optional quest system inspires players to approach the adventure from a less linear perspective, extending the life of the gameplay experience.

    buy, amazon

    Game: Madagascar Kartz

    Madagascar Kartz is a car racing video game based on DreamWorks Animation movie. Developed and published by Activision for the Xbox 360, PlayStation 3, Nintendo DS and Wii. The game will release on October 27, 2009. It is a basic kart racing game, and you can perform Jump behind the wheel and drive yourself wild as you play as Alex, Marty, Gloria, Melman, King Julien or those crafty penguins! You can power-up and perform zany jumps, outlandish flips, and radical rolls on amazing tracks from the world of Madagascar, including the New York City Zoo, the plane crash site, the volcano, plus many more.

    Madagascar Kartz Animal Racers Trailer


    madagascar kartz, video, game, coverKeep an edge on your wild competitors with cool pickups, such as power boosts, obstacles, and projectiles. DreamWorks' Madagascar Kartz features split-screen head-to-head multiplayer action, allowing up to four players to go bananas and race locally against one another in Championship, Quick Race and Time Trial modes.

    buy, amazon

    Saturday, October 24, 2009

    LCD Module Control over IR Link

    Recently I got my hands on a couple of HSDL-1100 based IR transceivers and a KS070B LCD display module. This was a nice opportunity to experiment with three things: (1) controlling an LCD module, (2) serial communication between two PIC microcontrollers, and (3) making this work over an IR link.

    Serial protocol supports addressing of up to 32 devices over shared media (IR or direct connection) and have basic error detection (2 inverse parity bits). Packets consist of 16 bits, as given below:

    Byte 0 Byte 1
    01 23 45 67 89 1011 1213 1415
    P0P1Device ID C/DCommand/data bits
    • P0 - inverse parity of all even numbered bits [2-14]
    • P1 - inverse parity of all odd numbered bits [3-15]
    • Device ID - ID of the target device; LCD responds to ID 00001
    • C/D - Code or Data; if "1", following byte contains command (for example, LCD "CLEAR SCREEN" command); if "0", following byte contains data (in case of the LCD this would be code of a character to be displayed).
    Data is encoded as a sequence of short pulses. The beginning of a data packet is shown below:
    The time between the first two pulses (T) is compared to the times between the following pulses. "0" is transmitted as time between pulses less than T; "1" - time between pulses greater than T.

    The receiver code and the LCD constants include file can be used without any change. The transmitter generates a moving two line "Hello World!" message. Note that transmitter was written for use with IR modules that invert pulse polarity - for direct connection pulse polarity must be inverted in the transmitter code.

    Countdown Timer

    This is a simple countdown-timer-on-a-chip project - you program the PIC, attach some buttons and a pair of 2-segment LEDs, and you are done.

    I used this timer for one of my projects, but I tried to make that timer as generic as possible, so it can have other applications. On this site I describe only the timer itself - code, pinout, and operation. If you want to see something built with the timer, check my Air Sampler project.


    Specification

    • Two digit LED display with maximum count time of 99 units (units are configurable and can be seconds, minutes, or hours).
    • Start/Stop/Increment/Decrement buttons working in press and press-and-hold mode.
    • Optional Increment-by-ten/Decrement-by-ten buttons.
    • Pause and resume.
    • Add or subtract time while timer is running.
    • One output to control an external device or signal time state.
    • One unused pin - you can customize the code to make use of it as an either input or output.
    • Works with a cheap 3.579545 MHz (NTSC) crystal, easily adjustable to other frequencies.

    You can give it a try right now - the widget on the right is a fully-operational simulation of the timer, configured to count seconds. Adjust the time using the +1, -1, +10, and -10 buttons. Start the timer with the SET button. Pause, stop, or clear timer by pressing RST. Pressing and holding a button works as you would expect from any timer. The green LED will show you when the timer is working - in real life, instead of the LED you will most likely have some device controlled by the timer.

    Air Sampler


    Hairs and spines - Check! Way too many legs - Check!

    Do you ever wonder what is in the air you breathe? Or maybe you have hay fever and want to know what kind of pollen makes you sneeze in spring? Questions like that prompted me to build a simple device for capturing airborne particles so they can later be examined under a microscope.

    Before you take your next breath, here is an important piece of advice: DON'T!

    It turns out that the air is full of pollen, dust, spores, artificial fibers, and some things that definitely do not belong there such as pieces of decomposing vegetation, tiny insect body parts, and moth poop. (OK, the moth poop bit was an exaggeration; it could have been butterfly poop.) That is the air outdoors. Indoors it gets much worse. Don't ask.

    If you are still reading, you are either very brave, or something is seriously wrong with you. Whatever the reason, if you are interested you can check details for the air sampler project below. Make sure to view some pictures of the "catch" too.

    Red Light for Astronomy Observing

    When doing astronomy observing at night preserving night vision is critical. This requires using the minimum amount of light that makes the sky charts readable. What is this minimum level depends on how dark are your surroundings, how much time you have spent in darkness, how well your eyes adapt for night vision, what type of charts are you using, what object are you observing, and so on. My old astronomy light was not very convenient - it only had two brightness levels, "too bright" and "not quite that bright", and it was eating batteries like crazy. This one is a huge improvement and is a real pleasure to use.

    The PIC light has a brightness level that can be adjusted anywhere between comfortably bright and almost invisible with 128 steps of adjustment. Those 128 levels are distributed exponentially, to match the non-linear light sensitivity of the eye. In addition, there is a button for temporary brightness boost. This is convenient in the cases where you want to have the light really low, and bring it up a bit for a second only when you are trying to see some tiny detail on the star charts. The "boost" level is also fully adjustable.


    The light consists of two parts - an old desk lamp with a patch of LCDs in place of the bulb, that is connected through an audio jack to a box containing the controller and the battery. I'm using an old computer mouse as controller/battery enclosure - this way, I can have the control buttons in a convenient place next to my charts. Instead of having an on/off switch, the light is turned on simply by plugging the lamp jack into the "mouse" (this required a slight modification of the female jack by bending a bit one of the contacts - you could figure it out by looking at the schematics). When I'm packing the light the mouse part goes into my crowded toolbox - with no on/off switch there is no danger that it will get turned on and I'll discover the battery drained next time I need it.

    Here is the inside of the "mouse" - the size is perfect for the electronics and a 9V battery:


    I cut off most of the original mouse PCB, leaving only the buttons and connecting those with the microcontroller. A foam insert at the bottom makes for a snug fit that does not require any glue or screws for the circuit board or the battery.

    Operating the light:
    • Turning the light on and off. Plug the jack into the controller and the light switches on; an average brightness level is selected by default. Unplugging the jack turns the light off.
    • Adjusting the brightness. The brightness is adjusted by pressing and holding the left or right mouse buttons. When you get to a convenient brightness level, release the buttons.
    • Momentary brightness boost. Press and hold the middle mouse button. The brightness will increase until you release the button and then will return to the previous brightness level.
    • Adjusting the "boost" brightness. Press and hold the middle mouse button. Select a new "boost" brightness level using the left and right buttons.

    DTMF Phone Dialer

    The company I work for recently upgraded their phone system. They got a new IP phone system that can supposedly do everything - the new phones have big LCD screens with fancy menus, lots of different modes, PC connection for remote control of the phone, e-mailing voice messages, and tons of other features. All that said, there was a critical piece missing from the picture - a way to dial a stored number while already in a call. This is a feature I use often - I'm using a calling card to call home and I need to first dial the 800 number and then send my calling card pin number. Well, believe it or not, the cool new phones with all the fancy software couldn't do this and I had to switch back to pencil and paper! "We will include this feature in release 8.0 or possibly 8.5" was the response from the phone company. Yeah right, like I'm going to wait for 8.5!

    So, here is the obvious solution - a dialer box that connects to the phone and can be used to store and dial phone numbers, pins, credit card numbers and what not. The circuit uses a NTE1690 DTMF dialer chip and a PIC16F690 microcontroller.

    Because this is an IP phone and I cannot just send the DTMF tones over the line, the easiest place to plug in the box is between the phone and the handset. The box has two RJ9 ports at the back - one gets connected to the headset's port on the phone, the other to the headset itself. The dial tones are sent over the microphone line. This way, it works both on IP-phones, and on standard (old fashioned, non-IP) ones.

    Here is the thing, assembled and put in an old network transceiver box:


    Sure looks ugly, :-) A friend of mine likened it to something from Dr. Evil's hideout. All the better - this is the way I like it! Ugly or not, the dialer works perfectly and can dial at blazing speed - so fast that it sounds more like R2-D2 than a phone.

    The headset from the phone is connected to one of the RJ9 ports under the "AUI PORT" label; the other port is connected with an extra headset cable to the phone body. The pins sticking out on the other side from the port formerly known as "10BASE-T" can be connected to Microchip's PICkit 2 programmer for updating the firmware without taking the box apart.

    The dialer is operated this way:
    • Storing a number. The device can store up to 12 numbers, identified by a bank ID. The ID is one of the buttons 0-9, SEQ, or RST. To store a number, press ENT, followed by the bank ID button. After pressing the bank ID, the green LED will light up, showing you that the device is expecting the number. Enter the number sequence (up to 15 digits); the SEQ button corresponds to the *-key on a phone; the RST number is #. You can use the DEL or TKO buttons to insert a pause. When you finish press ENT to store the number, or ABT to discard the changes and leave the old number stored in this bank unchanged. The green LED will turn off at this point. Example: To store the number 555-1234 in bank 0, press ENT-0-5-5-5-1-2-3-4-ENT.
    • Dialing a stored number. Just press one of the 12 bank ID keys (0-9, SEQ, or RST). If there is a number stored in that bank the device will dial the number, otherwise nothing will happen. Example: To dial the 555-1234 stored number (see "Storing number" above) simply press the 0 button.
    • Copying a stored number from one bank to another. Moving stored numbers around is a useful feature that I have not seen in any off-the-shelf dialer. To copy a number, first press ABT. The LED will light prompting you for source bank ID. Press the source bank button. The LED will remain on, waiting for a target bank ID. Press the target bank button. The number stored in the source bank will be copied to the target bank. You could cancel the operation at any time by pressing ABT. Example: To copy the 555-1234 number stored in bank 0 to bank 3, press ABT-0-3. After this, pressing the 3 button will dial 555-1234.
    • Manually dialing a number. Press the DEL button. The LED will turn on. Now you can use the keypad to dial any number. The SEQ button corresponds to the *-key on a phone; the RST number is #. To exit manual dial mode, press the DEL button again (pressing ENT, TKO, or ABT button will exit manual dial mode too). The LED will turn off at this point. Example: To manually dial 555-9999 press DEL-5-5-5-9-9-9-9-DEL.
    • Changing the dial speed. The maximum reliable dial speed depends on the system that you are dialing into and the noise on the line. To change the dial speed press TKO. The green LED will light up, indicating that the dialer is waiting for you to select dial speed. Press a number button between 0 and 7. The new dial speed will be set, 0 being the lowest speed, and 7 - the highest. The green LED will turn off after the speed is selected. Example: To switch to the highest dialing speed press TKO-7.

    Here are some notes, in case you want to build such a dialer:
    • It's not very likely you'll find exactly the same keyboard that I have (this one I got for $0.33 apiece from a great electronics store in Santa Clara, CA; check also my list of SF Bay Area electronic shops). In case your keyboard have different layout, the change is easy to make - simply adjust the K_something constants defined in the beginning of HandheldDialer.asm. Define your layout by changing the hex digits to match the corresponding button on your keyboard (compare the source and the images of the keyboard to figure out the numbering of the buttons).
    • The schematics doesn't show the power supply. I'm using internal supply with a 9V battery and a 7805 voltage stabilizer. A sample design can be find here. Or maybe you will chose to construct something with external power supply?
    • Handsets may use different microphones, and can be wired in a different way. The schematics diagram shows two ways to connect to the handset cable - use whichever works for you. Special thanks to the friendly guys from the sci.electronics.design newsgroup for the help with the alternative design.